


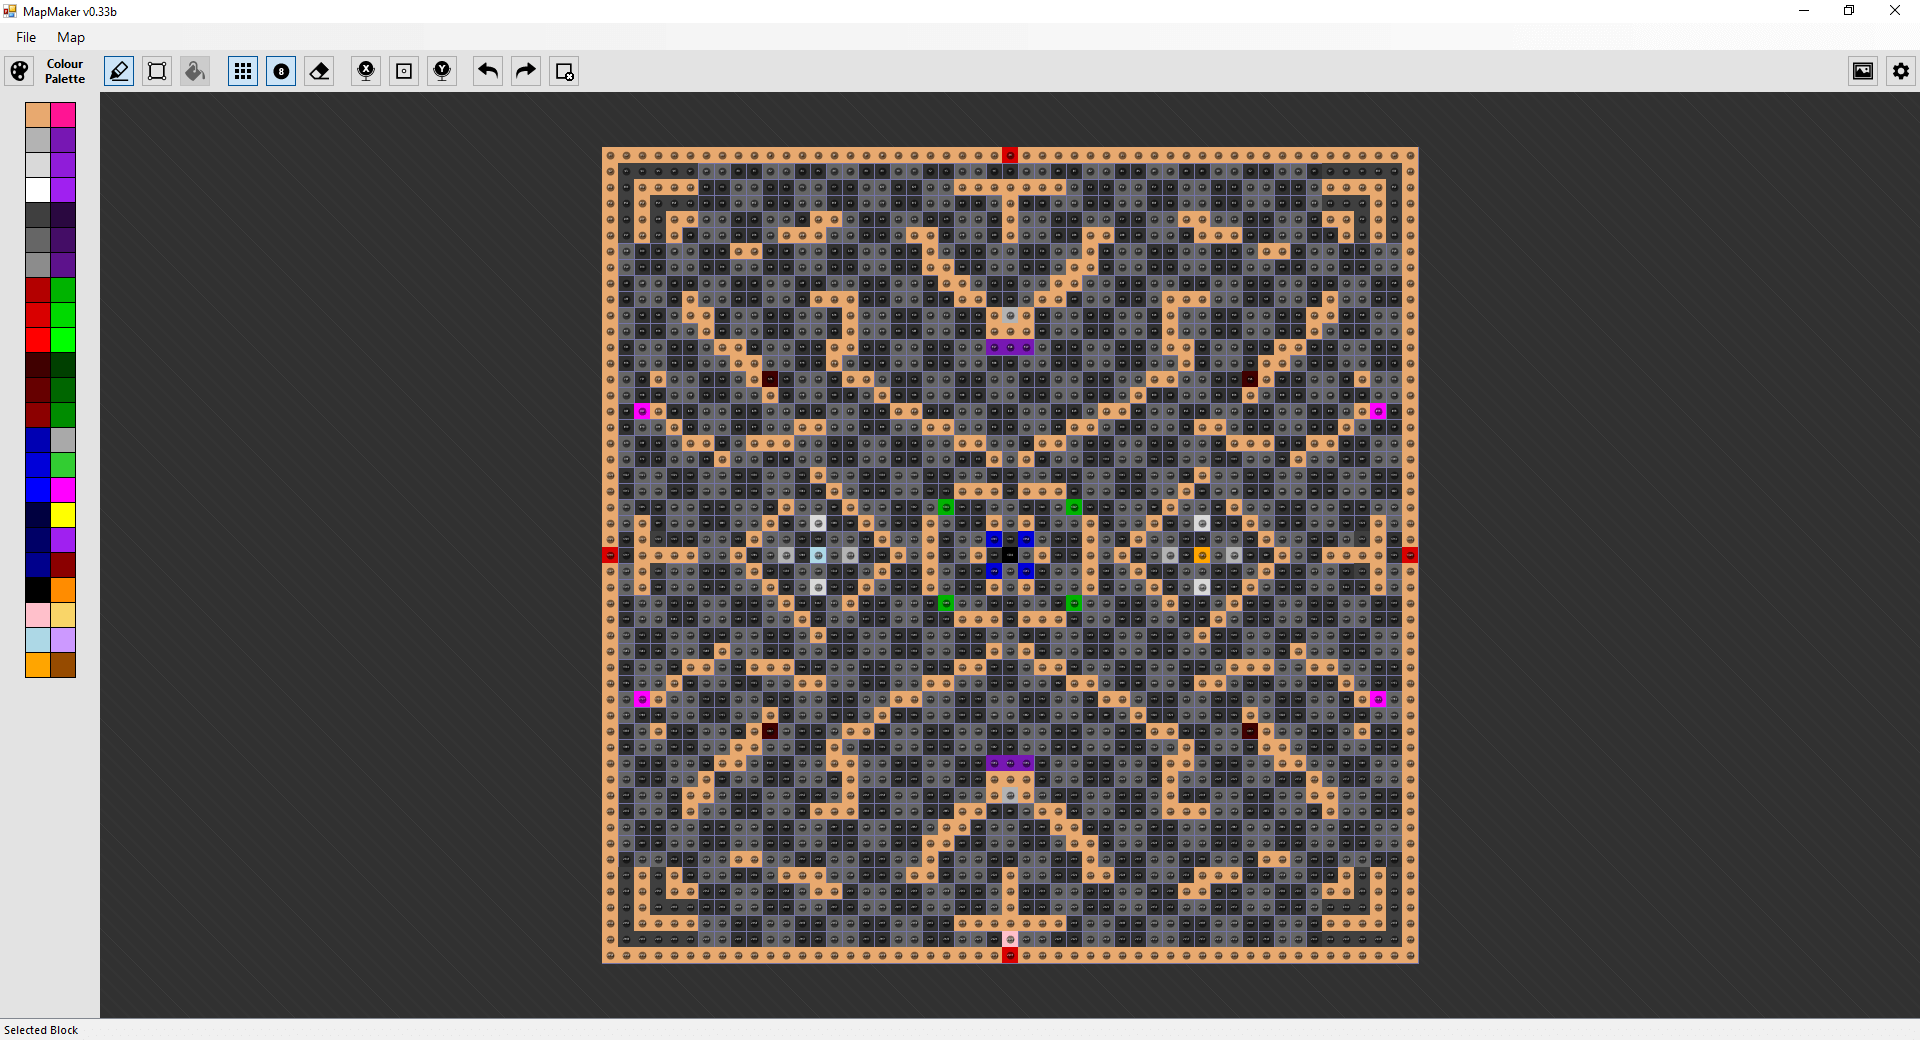
Map Maker Beta Released 0.35B
Because of the continuing development of the Gauntlet clone, and now with the new release we have three different maps to play Arcade, Custom or ZXSpectrum, we have released a cutdown version of your in house software called Map Maker it allows the user to create levels using blocks of colour for any game but is designed for gauntlet and post their results to the support email so they can be put into the game.
If you would like a bit of fame, You can download here The zip contains the exe file, document file, and the gauntlet palette file see the document file on how to us map maker, and lets create some maps.
The following is how it will work:
- Download the Map Maker zip file (you should not need winzip to open this file if using win7/8/10).
- Read the Document file in the zip it will tell you everything you need to do (it's only small) but you can install it anywhere.
- A maximum of 100x100 should be used as it could take the player a while to finish the map, the maximum so far is 95x82.
- It's already setup for gauntlet, but you must load the Gauntlet Palette before starting the map (as you can see in the image above)
- You can download the example Map Pack if you like here
- Once your map is finished email it to: support@thelittlegamesstudio.com
- let us know some details which Wall/Floor set images you want to use(cell number), the files are in the Map Maker zip
- If you use Traps we need to know what tile(s) are affected by each individual trap tile placed.
- What you want to call the map, and a little description if you want.
- We will email you back the finished map, just incase we have missed something.
- That's it for now.
The History
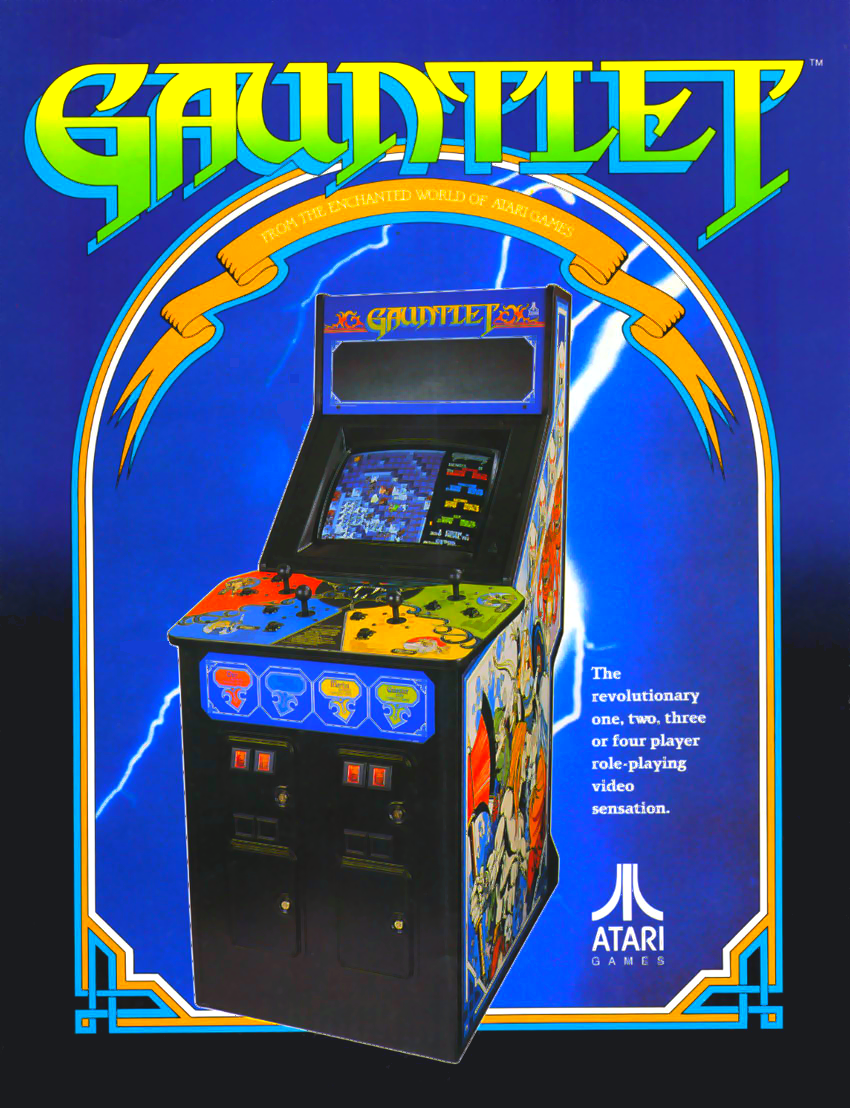
Gauntlet is a fantasy-themed hack and slash 1985 arcade game originally by Atari Games released in October of 1985, Atari ultimately sold a total of 7,848 Gauntlet video game arcade cabinets.
It is noted as being one of the first multi-player dungeon crawl arcade games.
Game Play
Upon selecting a playable character(four characters to choose from), the gameplay is set within top-down view enviroment, third-person perspective mazes where the object is to find and walk over the designated exit in every level. An assortment of special items can be located in each level that increase player's character's health, unlock doors, gain more points and magical potions that can destroy all of the enemies on screen.
The enemies are an assortment of fantasy-based monsters, including ghosts, grunts, demons, lobbers, sorcerers and thieves. Each enters the level through specific generators, which can be destroyed. While there are no bosses in the game, the most dangerous enemy is "Death", who can not only drain a character's health, but is difficult to destroy.
As the game progresses, higher levels of skill are needed to reach the exit. While contact with enemies reduces the player's health, health also slowly drains on its own, thus creating a time limit. When a character's health reaches zero, that character dies.
Previous Ports and re-releases
Due to its success in the arcades, Gauntlet was ported to several home systems of the day. These platforms include DOS, Apple II, Atari 8-bit, MSX, NES, Atari Lynx, Apple IIGS, Sega Master System, Mega Drive/Genesis (as Gauntlet 4), Atari ST, Commodore 64, Amstrad CPC and ZX Spectrum, among others. In 2003, an emulated version of Gauntlet was included in Midway Arcade Treasures; a compilation of arcade games available for the Nintendo GameCube, PlayStation 2 and Xbox consoles and Windows. For some machines, only Gauntlet II was converted, since it was considered to be more advanced than the original. In 1990, the original Game Boy received a version of Gauntlet II. 16-bit conversions (Atari ST and Mega Drive/Genesis) had similar sound and graphics as the original game, and retained the four-player mode (lesser machines only allowed a maximum of two players). A port of Gauntlet is also playable in Lego Dimensions, and the Thief enemy appears as one of the bosses in the story mode.
Current Port
This current port is based on the original released game of the same name now effectively called 'Gauntlet Classic' and using the Atari ST character set (as no other sets where available), to make it as genuine as possible there is no antialising in the character set, so it feels 'old school' because of the age of the game, there is no original maps available, the current map set that's been created, is based on the ZX Spectrum of the same game, the first seven maps on any port (2d versions) of the game are all identical but after that the developers had a free for all.
That said I've crafted, found or ported as many of the origianl features and sound effects as i can see (many hours on youtube watching the original been played), even going down the route of using youtube and grabbing the sound(s) effects from a game if I cannot find one.
The port is also a 80/20 which means 80% of the game is from the original, if something is missing I've taken great lengths to replace it with something similar or in the case for samples not substituted one at all, I'm still looking for more of the original material but it's increasingly difficult to find.
features
● 50 (more to come) levels of hack and slash mayhem, sweeeet!
● All original characters and monsters in-there.
● A friendly touchscreen experience (hopefully).
● Auto save game after every level completed.
● No ads, no in-app purchases. Enjoy the full content (hurray for that one)
● No internet connection needed to enjoy the game once installed.
● Type: Arcade, Hack and slash
Characters
Gauntlet contains four hero characters, each has their own strengths and weaknesses, this is a single player only version, the following information appertains to Gauntlet 1 also known as Gauntlet Classic.
Warrior (Thor)

Thor is the basic brute-force character. He is the only character to begin with a shot capable of delivering the power to chew through level 2/3 enemies with ease. This power comes at a price. Thor's disadvantage is that a lack of magic power ability.
Valkyrie (Thyra)

Thyra's focus is on her defense. The problem is that, while the resistance is pleasant, it is nowhere near high enough to justify her low magic level. Compared to Thor, her magic is only a bit better at damaging 'block' type generators and the monsters that come from them. Like Thor, Thyra will struggle to clear areas with magic, and will probably need to dump 2 or more potions to get the job done. If generators remain, in many situations the enemies will respawn with little to no progress made on your part.
Wizard (Merlin)

Merlin's magic will clear the entire screen, monster and generator alike. This reason alone is enough to place him in the top tier. While all of his other statistics are relatively worse than with other characters, nothing important is weakened. In fact, he only really loses out to Questor's superior speed and similar magic ability.
Elf (Questor)

Questor's speed is his special trait. He can run circles around enemies, and escape damage others would certainly take. His ability to attack and retreat, something that you must do often in Gauntlet, is unparalleled. When he obtains an Extra Speed potion, he can sometimes run right through an enemy filled hall and take no damage. This specialty would be enough of a reason for investigation on its own, but it happens to be paired with a magic level just a hair less powerful than that of the Wizard. The Elf cannot silence level 3 generators initially with a single potion, but this temporary drawback is more than made up for by his superior speed, which gets even better once upgraded.
Generators
Level 1 |
Level 2 |
Level 3 |
 |
 |
 |
 |
 |
 |
Generators are the primary threat to your survival, some monsters do appear already on each level, but most come from a generator.
Enemies can be generated out of all the directions around the generator, unless there is an obstacle in the way that is.
There are two types: bones and blocks. Ghosts spawn from bones only, while everything else spawns from blocks.
All Generators come in 3 levels: 1, 2 or 3, each generator looks slightly different, this depicts what level of monster a generator will produce.
A hero can reduce the monster level that the generator produces by firing at it or melee attacking, once the generator is at level 1 and it has no more heath it will be destroyed.
Enemies
Like generators, enemies come in 3 levels, with the level being equivalent to that of the generator that made them. The higher the level, the more HP they have and the more damage they'll deal out.
You can spot different levels by how transparent they are, the more transparent an enemy is the lower the level it will be.
Ghosts
Level 1 |
Level 2 |
Level 3 |
|
|
|
 |
 |
 |
4 dmg |
5 dmg |
6 dmg |
A single enemy usually isn't too dangerous, but a pack can be deadly.
Ghosts don't use melee attacks like other enemies. Instead, they kamikaze into you, which is far more dangerous.
By destroying themselves, they permit instant access to the next Ghost in line. Worse, they deal much more damage on contact than a melee attack: 10, 20, and 30 base damage respective to their level. The result is a very high rate of damage.
Ghosts are arguably the hardest to deal with. You will need to be extra cautious in dealing with them, lest they slip past your defenses and sap your health.
Grunts
Level 1 |
Level 2 |
Level 3 |
|
|
|
 |
 |
 |
2 dmg |
2 dmg |
3 dmg |
Grunts simply attack repeatedly with their club when standing next to you. They are a low tiered enemy, although definitely threatening. If they surround you, you may need to use melee attacks to break free, since aiming at each manually is difficult.
Demons
Level 1 |
Level 2 |
Level 3 |
|
|
|
 |
 |
 |
2 dmg |
3 dmg |
4 dmg |
Once within a certain range of a Demon, they will shoot fireballs at you, which do 10 damage regardless of the level of the Demon.
If you get close, they will use bite attacks that have equal strength to Grunt club attacks.
Demon fireballs will damage anything. They will also open fire if they are in range, no matter what is in the way. If one hits a breakable piece of food or blue potion, it will destroy it (potions won't activate). You must be careful not to accidentally train their shots onto such items. In contrast, you can also train their shots onto enemies to damage or destroy them. Look for opportunities to use this to your advantage.
Sorcerers
Level 1 |
Level 2 |
Level 3 |
|
|
|
 |
 |
 |
3 dmg |
4 dmg |
5 dmg |
These enemies flash invisible constantly. Shots will pass through them when they turn invisible, making them more difficult to hit. This can be annoying, and allow them to get in range for their melee attack, but it also leaves their generator less well defended.
Lobbers
Level 1 |
Level 2 |
Level 3 |
|
|
|
 |
 |
 |
1 dmg |
1 dmg |
1 dmg |
These enemies can throw rocks quite a distance, even over walls. They have no melee attacks.
Their rocks only do 3 base damage, making them one of the weaker enemies offensively. However, they are often situated behind barriers, meaning you'll have to deal with them for a while. The damage does add up fairly quickly if they can get a bead on you.
Lobber rocks can also destroy potions, food, and other enemies.
Because they can be thrown over walls, it's possible to hit almost anything if you can train them.
The Lobbers have a strange lead-off AI that doesn't consider walls, and can't predict erratic movements. It takes some getting used to, but would be wise to learn since you can take out threats that would otherwise cause you much grief.
This monster rarely has a generator that makes them.
Lobbers do 3 base damage with their rocks, no matter what level they are.
Death

Death is a special enemy. You can't kill it in the normal way. Any type of potion attack will kill it instantly, no matter how weak.
When it comes into contact with the player, it begins to drain HP at a rapid rate. It will drain up to 200 HP if permitted to do so. If it reaches the limit of 200 health, it will disappear. Since this is a considerable amount of your health, make sure it doesn't happen. Either use a potion or, if you can get a sufficiently open space, dodge around it.
If you shoot Death, it will give you a single point for every hit. This isn't very lucrative, even if you can do this from behind a pair of blocks - you'd be far better off camping over a corridor leading to a generator.
However, what is very lucrative for scoring is using a potion on Death.
By default, you score 1000 points. There is actually a variable points value for killing Death with a potion.
Every time you hit Death with a shot, you cycle the value. By default, it is 1000 points. The full cycle is, starting from default: 1000, 2000, 1000, 4000, 2000, 6000, 8000, and then back to the default 1000. If you want to get the most points, shoot death exactly 6 times.
Items
Exit

Exits do what you'd think: progress you to the next level. During the 7 introductory levels, a trio of Exits found throughout also indicate a number, which indicates the level you'll skip to.
Walls

Walls are what you'd expect. They get in your way, as well as the way of any enemies.
Breakable Wall

Some walls, denoted by their grittier texture, can be destroyed by shots, once you have destroyed the wall it will open you up to explore a new area.
Teleporter

Touching one of these will usually teleport you to the closest adjacent teleporter.
If there are two within reach, you can end up at either one.
Doors

Doors can be any shape and size, and any door tiles touching will all unlock at once with a single key.
Having a key for a door can make progress a bit easier, but it isn't necessary. If you remain free of engagement in battle with monsters for 18 seconds (36 if you have keys), all doors in the level will be unlocked. The main strategic purpose of using a key on a door, instead of stalling them open, is for flood control. Doors often obstruct enemy hordes from coming after you, and opening the doors one at a time allows you to control how many enemies can attack you, and when.
Keys

The things that open the doors.
Be careful about picking up too many keys. They share the same 12 inventory spaces as potions, and can only be gotten rid of by using them on a door. Also, if you are full of keys and/or potions, you may not pick up either.
Keys give you 100 points, much like treasure. You'll either want to pick them up for score, or avoid them to keep the rank down.
Potions

These smartbomb-like weapons will attempt to damage everything on the screen. They can clear extremely congested areas in the game, if utilized correctly. They are also the only way to destroy Death enemies. If there is a Death enemy that cannot be slipped past, you will likely want to Potion to save yourself from losing 200 health.

The things that open the doors. Be careful about picking up too many keys. They share the same 12 inventory spaces as potions, and can only be gotten rid of by using them on a door. Also, if you are full of keys and/or potions, you may not pick up either. Keys give you 100 points, much like treasure. You'll either want to pick them up for score, or avoid them to keep the rank down.
The orange potions are indestructible, but the blue potions will be activated when shot. If a blue potion is activated in this way, it will have a reduced effect. This maneuver should only be invoked in emergencies, such as when your character is enveloped by enemies and you can't reach the potion soon enough, or you are overflowing with keys with Death chasing you. Most of the time, you should be careful of doing this by accident. You'll also want to be careful not to attract enemy shots into the potion (such as from Demons), as these will break them with no effect.
Treasure

Worth 100 points. You'll either want to pick it up to increase your score
Be careful about picking up too many keys. They share the same 12 inventory spaces as potions, and can only be gotten rid of by using them on a door. Also, if you are full of keys and/or potions, you may not pick up either.
Keys give you 100 points, much like treasure. You'll either want to pick them up for score, or avoid them to keep the rank down.
Food

Food can have various appearances, but always increases your health by 100. Most forms are indestructible, but be careful not to accidentally shoot the bottle marked with two exes. Also be careful that you don't inadvertently train enemy shots onto it, as that will destroy it just the same.

It is wise to seek out every piece of food in every level, especially considering the diminishing supply due to the ranking system.
Then again, certain pieces of food may just not be worth it if you can't get to it without taking insane damage.
Trap

When stepped on, they will open up some area of the level (often a place you can't see or haven't even reached yet). Usually, you must step on them to reach the Exit in the level they appear in. In at least one level, stepping on them opens up access for enemies that could otherwise be avoided.